

How To Free Up Video Memory On Windows 10
The graphics card is the most determining piece of hardware of your system when information technology comes to impacting your overall PC performance. If your graphics carte du jour (defended or integrated) is old with mediocre specs, you'll most likely exist prohibited from accessing new and hot applications and games. If you lot don't have the coin for a brand new GPU, yous might be able to fool your system past faking a VRAM increase. Moreover, If you are using High-End Processors similar the Core i9-9900k for example, you need to brand sure, it's not bottlenecked by the low ram. These processors come up up with incredible motherboards, and taking the best out of them is necessary.
What is VRAM?
Most of the errors generated past a defective graphics bill of fare accept something to do with the video RAM (VRAM). VRAM is a special type of RAM that is responsible for holding on to information that the GPU needs. It enhances performance by allowing the GPU to fetch info and beam it to your monitor in a hasty matter.
VRAM is much faster in performing GPU-related tasks because information technology's specifically built for this high-intensity purpose and it's physically much closer to the GPU. You're probably aware that integrated graphics cards are budget-friendly but come nowhere near to the graphics output of dedicated solutions. But keep in mind that having more VRAM won't necessarily enhance the performance of your computer.
Having insufficient VRAM means that your system needs to make apply of standard RAM – this translates into performance drops, lower frame rate, texture pop-ins, and other things of this kind.
If yous are prevented from running certain games or applications because you have insufficient VRAM, you have a few ways forward.
How to Increase the Dedicated VRAM of your GPU
Of course, the best way of increasing your video RAM is to buy a new graphics card. If your dedicated GPU is outdated or you're still relying on your integrated graphics carte du jour, upgrading to a new GPU model will requite a huge boost to the overall operation (if you take CPU and RAM expert plenty to sustain the growth).
However, if you don't have the money for an upgrade, at that place are two other means that you can use to increase the defended VRAM of your GPU (at least on paper). Feel costless to follow whichever method seems more outgoing considering your item situation.
How to check the amount of video RAM
Earlier you begin the procedure of faking a VRAM increment, you mustn't lose track of the real count. Hither's a quick guide on seeing the corporeality of video RAM (VRAM) that you have on your figurer.
Note: The steps below were created with Windows ten in mind but you lot'll near likely be able to recreate them on older Windows versions. For additional assistance, refer to the Note paragraphs under each step.
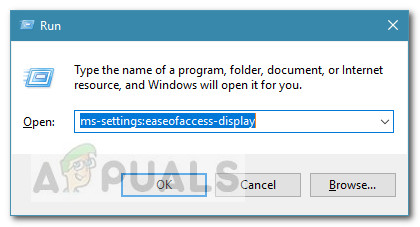
- Press Windows key + R to open up a Run box. Then, blazon "ms-settings:easeofaccess-display" and hit Enter to open up the Brandish tab of the Settings app.
 Notation: For Windows seven and Windows 8, supplant the control in a higher place with dpiscaling and hitting Enter.
 - Curl down and click on Advanced display settings,then click on Brandish adapter backdrop for Display 1.

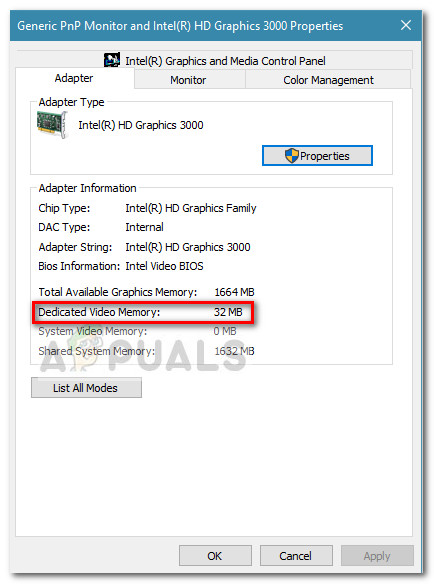
- You can check out your VRAM count nether Adapter information at Defended Video Retentiveness. But go along in mind that if you have both a dedicated GPU and an integrated graphics carte du jour, this window will evidence you the integrated solution if your PC is idle.
 Note: If you're dedicated GPU is idle, you lot can force your system to switch to information technology by performing a stressful activity. Also, you can access your dedicated GPU utility (east.g. NVIDIA Control Panel) and see the defended Video Retentivity from there.
Increase Dedicated VRAM from BIOS
The first and the about recommended make-do solution is to arrange the VRAM resource allotment from your figurer BIOS. Sure, this method is not applicative on all motherboards, simply most manufacturers include an pick to tweak the VRAM allotment.
Here's a quick guide on increasing the dedicated VRAM from the BIOS settings:
- Restart your estimator and enter the BIOS settings at the next startup by pressing the defended BIOS primal repeatedly during the bootup. Try pressing the F2, F5, F8, or Del key repeatedly. If that doesn't work, search online for specific steps on entering the BIOS settings to your motherboard manufacturer.
- In one case you reach the BIOS carte, wait for a menu similar to Graphics Settings, Video Settings or VGA Share Memory Size. Yous can typically find information technology under the Advanced menu.
- Then, upward the Pre-Allocated VRAM to whichever pick suits you best.

- Relieve the configuration and restart your estimator. At the next startup, employ the procedure higher up to see if the VRAM count has been increased.
If this method wasn't applicable or y'all're looking for a different approach that doesn't involve altering BIOS settings, continue down to Method two.
Increment the Dedicated VRAM via Registry Editor
Keep in listen that for most integrated graphics cards, the corporeality of VRAM reported in the Adapter Backdrop window is completely irrelevant for the actual performance since the arrangement volition automatically adjust it on an on-demand basis.
However, some games and other awarding types volition not let you to run them if you are nether the minimum specified VRAM. In this case, you can utilize a Registry Editor trick to change the values so that the game will no longer encounter the error. Here'south a quick guide on how to practice this:
Note: Keep in mind that the following steps are just applicative for integrated GPUs from Intel. Also, this method won't give y'all any performance or actress boost in your games/applications this method volition only fob the games/applications to run on lower VRAM.
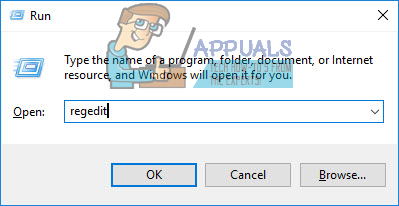
- Printing Windows key + R to open upwardly a Run box. Then, type "regedit" and hit Enter to open Registry Editor.
- Inside Registry Editor, utilise the left-manus pane to navigate to the following location:
HKEY_LOCAL_MACHINE \ Software \ Intel - Right-click on the Intel cardinal and choose New > Key and proper name it GMM.
- With the GMM key selected, move over to the right pane and select New > Dword (32-bit) Value and name information technology DedicatedSegmentSize.
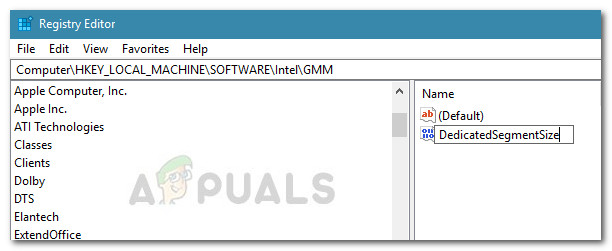
- Double-click on DedicatedSegmentSize, gear up the Base of operations to Decimal, and insert a value from 0 to 512. This value will exist the amount of VRAM displayed inside the Adapter Properties bill of fare.

- Save the changes and restart your computer to enforce the changes. At the side by side startup, see if you can start the game without the error.
![]()
Source: https://appuals.com/how-to-increase-a-dedicated-video-ram-vram-on-windows-10/
Posted by: clevengerheaden.blogspot.com
0 Response to "How To Free Up Video Memory On Windows 10"
Post a Comment